flutter
-
Flutter 로딩 페이지 만들기(Splash Screen)2021.11.11
-
[ MacOS ] Flutter 설치 및 초기 설정하기2021.11.03
Flutter 안드로이드 개발 - Install_failed_insufficient_storage 에러 해결

Flutter로 Android 앱 개발을 위한 디버깅 중 [INSTALL_FAILED_INSUFFICIENT_STORAGE] 에러를 발견하셨을 경우에 대한 해결 방법입니다.

기본적으로 처음 생성한 Android Emulator에는 800MB의 용량을 가지고 있습니다. 이 용량을 초과하는 App을 빌드하면 위와 같은 오류가 뜹니다. 여유공간을 넉넉하게 설정해주도록 합시다.
안드로이드 스튜디오로 가서

우측 상단에 있는 AVD Manager를 클릭합니다.
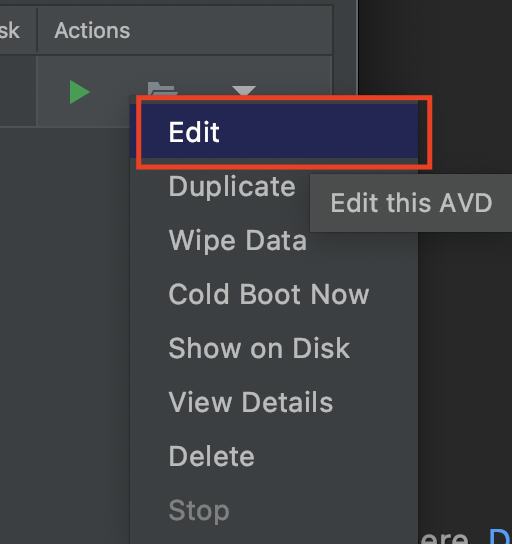
설정할 에뮬레이터를 확인하고 Edit을 통해 설정을 수정해줄 것입니다.
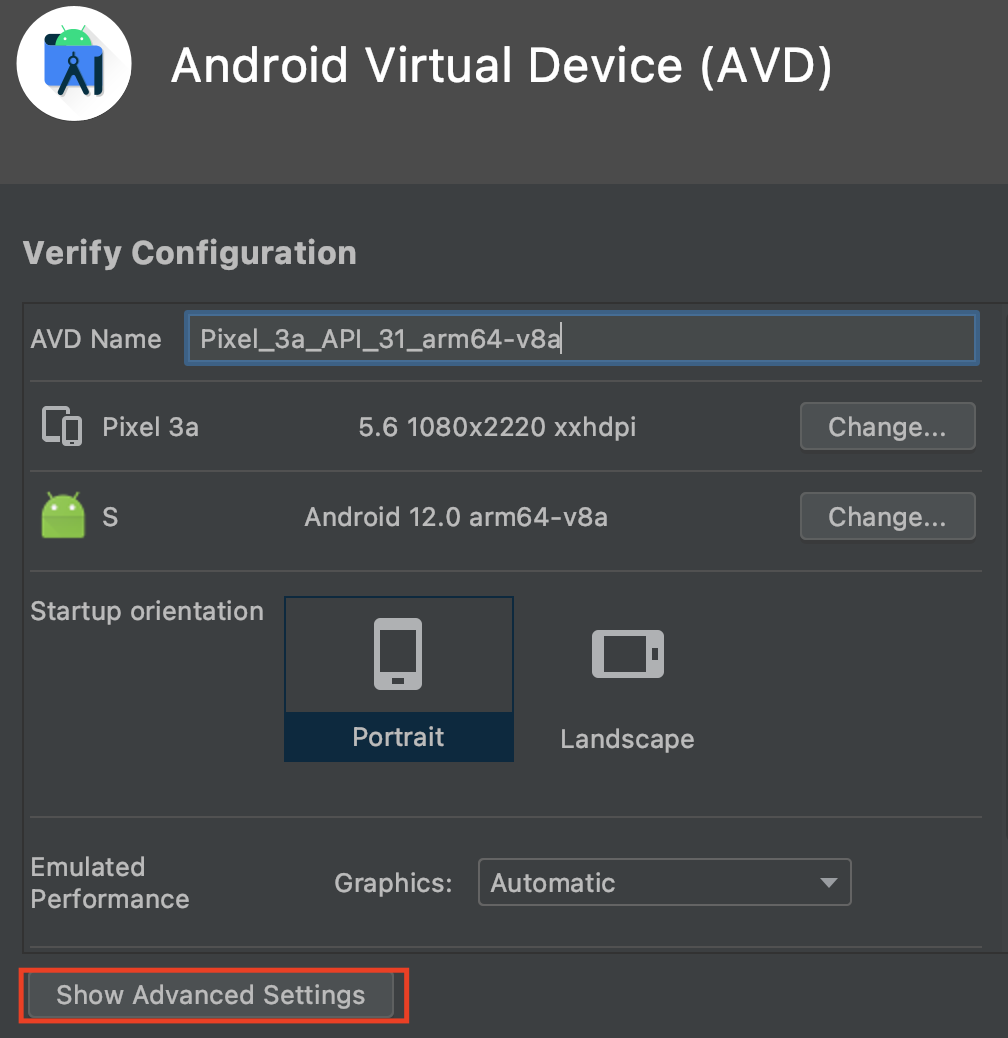
Show Advanced Settings를 클릭해서 고급 설정을 열어줍니다.
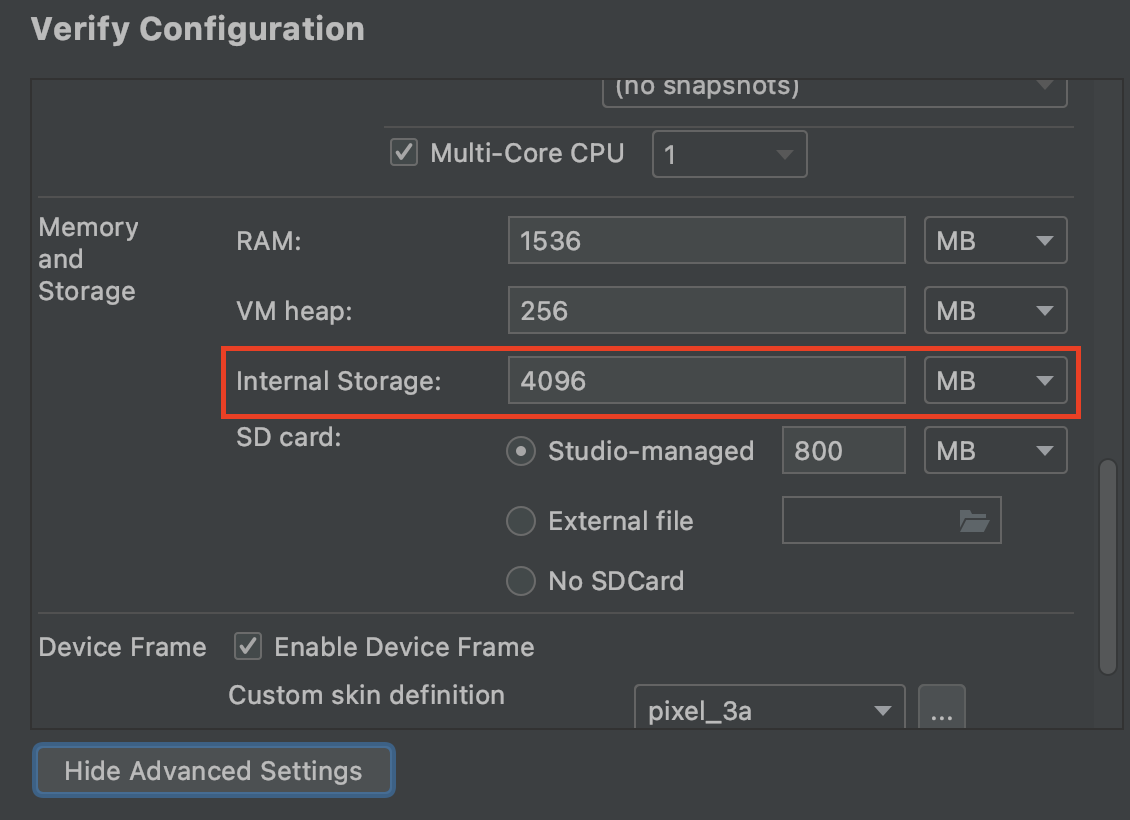
아래에 보시면 Internal Storage가 기본의 경우 800MB로 설정이 되어있을 것입니다. 이제 여유공간을 충분히 잡아주고 다시 빌드를 하면 됩니다.
'IT > Develop' 카테고리의 다른 글
| iOS 개발 - 출시 전 TestFlight로 내부 테스트 하기 (0) | 2021.11.23 |
|---|---|
| 구글 PlayStore 내부 테스트, 내부 앱 공유 사용 권한 얻는 방법 (0) | 2021.11.22 |
| iOS 개발, Xcode 아이폰 무선 디버깅하기 (0) | 2021.11.17 |
| Flutter 로딩 페이지 만들기(Splash Screen) (0) | 2021.11.11 |
| [ MacOS ] Flutter 설치 및 초기 설정하기 (0) | 2021.11.03 |
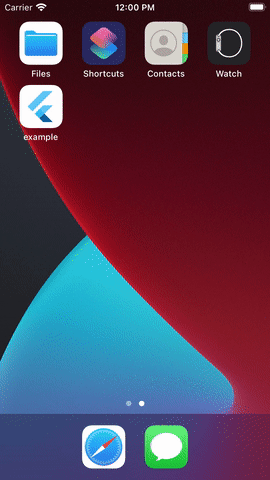
Flutter 로딩 페이지 만들기(Splash Screen)

모바일 앱을 실행했을 때 가장 먼저 보이는 페이지는 주로 로딩 페이지일 것입니다. 앱을 실행시키자마자 바로 메인 페이지가 뜨지 않고 대부분은 이런 로딩 페이지를 띄우죠. Flutter에서는 이 로딩 페이지를 Splash Screen이라고 부릅니다.
별도의 페이지를 구성하고 로고와 백그라운드 이미지를 구성할 필요없이 Flutter_native_splash를 사용하여 간편하게 이러한 Splash Screen을 구현할 수 있습니다. Flutter_native_splash는 현재 1.3.1 버전이 나와있으며 Flutter 2.0의 Null Safety가 구현되어 있습니다. 현재 두 가지 방법으로 이 Flutter_native_splash를 구현할 수 있는데 간단한 방법으로 제작하는 방법에 대해 살펴보겠습니다.
우선 사용하기 위해 pubspec.yaml에 Flutter_native_splash를 추가하고 flutter pub get 해줍니다.
dev_dependencies:
  flutter_native_splash: ^1.3.1
Flutter_native_splash 소개 페이지에 보시면 코드 내에 직접 작성하는 방식으로 구현한 예제가 있고, 종속성 설치시에 백그라운드 컬러 혹은 이미지를 pubspec.yaml에 직접 등록하여 사용하는 방식 또한 나와있습니다. 위에서 언급한 두가지 적용 방법이 바로 이것입니다. pubspec.yaml에 Color와 image 주소를 작성해주면 간편하게 사용할 수 있기에 저는 다음의 방법을 사용하였습니다.
flutter_native_splash:

  color: "#42a5f5"
  image: images/main.png
  # 변경사항 필요시 flutter pub run flutter_native_splash:create 와 remove 사용
color는 ""를 사용해서 작성해주면 되고, 이미지의 경우 이미지 파일의 주소를 작성해주시면 됩니다. 작성이 모두 끝이 났다면 저장하고 터미널 창에서 flutter pub run flutter_native_splash:create를 입력해주세요.
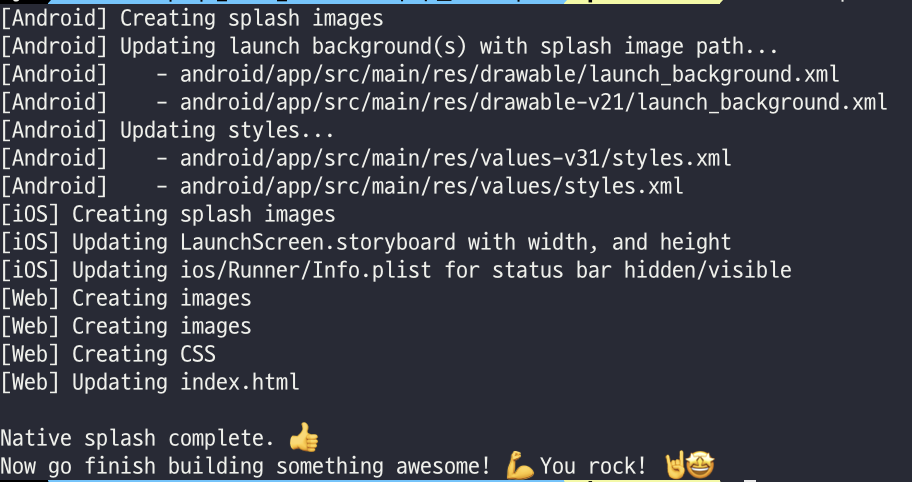
create를 통해 등록하고, remove를 사용하여 삭제해주시면 됩니다. 변경사항이 있을 때는 먼저 remove를 통해 지워주신 후에 변경사항이 적용된 버전을 다시 create로 등록해주세요.
저는 위에서 필요한 부분만 간단하게 사용하여 pubspec.yaml 파일에 작성했지만 Flutter_native_splash에서는 다음과 같은 기본적인 샘플을 제공하고 있습니다.
flutter_native_splash:

  # This package generates native code to customize Flutter's default white native splash screen
  # with background color and splash image.
  # Customize the parameters below, and run the following command in the terminal:
  # flutter pub run flutter_native_splash:create
  # To restore Flutter's default white splash screen, run the following command in the terminal:
  # flutter pub run flutter_native_splash:remove

  # color or background_image is the only required parameter.  Use color to set the background
  # of your splash screen to a solid color.  Use background_image to set the background of your
  # splash screen to a png image.  This is useful for gradients. The image will be stretch to the
  # size of the app. Only one parameter can be used, color and background_image cannot both be set.
  color: "#42a5f5"
  #background_image: "assets/background.png"

  # Optional parameters are listed below.  To enable a parameter, uncomment the line by removing
  # the leading # character.

  # The image parameter allows you to specify an image used in the splash screen.  It must be a
  # png file and should be sized for 4x pixel density.
  #image: assets/splash.png

  # The color_dark, background_image_dark, and image_dark are parameters that set the background
  # and image when the device is in dark mode. If they are not specified, the app will use the
  # parameters from above. If the image_dark parameter is specified, color_dark or
  # background_image_dark must be specified.  color_dark and background_image_dark cannot both be
  # set.
  #color_dark: "#042a49"
  #background_image_dark: "assets/dark-background.png"
  #image_dark: assets/splash-invert.png

  # The android, ios and web parameters can be used to disable generating a splash screen on a given
  # platform.
  #android: false
  #ios: false
  #web: false

  # The position of the splash image can be set with android_gravity, ios_content_mode, and
  # web_image_mode parameters.  All default to center.
  #
  # android_gravity can be one of the following Android Gravity (see
  # https://developer.android.com/reference/android/view/Gravity): bottom, center,
  # center_horizontal, center_vertical, clip_horizontal, clip_vertical, end, fill, fill_horizontal,
  # fill_vertical, left, right, start, or top.
  #android_gravity: center
  #
  # ios_content_mode can be one of the following iOS UIView.ContentMode (see
  # https://developer.apple.com/documentation/uikit/uiview/contentmode): scaleToFill,
  # scaleAspectFit, scaleAspectFill, center, top, bottom, left, right, topLeft, topRight,
  # bottomLeft, or bottomRight.
  #ios_content_mode: center
  #
  # web_image_mode can be one of the following modes: center, contain, stretch, and cover.
  #web_image_mode: center

  # To hide the notification bar, use the fullscreen parameter.  Has no affect in web since web
  # has no notification bar.  Defaults to false.
  # NOTE: Unlike Android, iOS will not automatically show the notification bar when the app loads.
  #       To show the notification bar, add the following code to your Flutter app:
  #       WidgetsFlutterBinding.ensureInitialized();
  #       SystemChrome.setEnabledSystemUIOverlays([SystemUiOverlay.bottom, SystemUiOverlay.top]);
  #fullscreen: true

  # If you have changed the name(s) of your info.plist file(s), you can specify the filename(s)
  # with the info_plist_files parameter.  Remove only the # characters in the three lines below,
  # do not remove any spaces:
  #info_plist_files:
  #  - 'ios/Runner/Info-Debug.plist'
  #  - 'ios/Runner/Info-Release.plist'
Flutter_native_splash Github에 직접 방문하셔서 자세한 내용을 확인하실 수 있습니다.
'IT > Develop' 카테고리의 다른 글
| Flutter 안드로이드 개발 - Install_failed_insufficient_storage 에러 해결 (0) | 2021.11.18 |
|---|---|
| iOS 개발, Xcode 아이폰 무선 디버깅하기 (0) | 2021.11.17 |
| [ MacOS ] Flutter 설치 및 초기 설정하기 (0) | 2021.11.03 |
| 마크다운(MarkDown) 문법 정리 (1) | 2021.10.05 |
| CSS로 footer 페이지 하단 고정하기 (0) | 2021.10.04 |
[ MacOS ] Flutter 설치 및 초기 설정하기

Flutter 와 React Native, 그리고 Apache Cordova 와의 비교는 추후에 다뤄보기로 하고
우선은 MacOS 기준 Flutter 설치 및 초기 설정 부분을 다룰 것입니다.
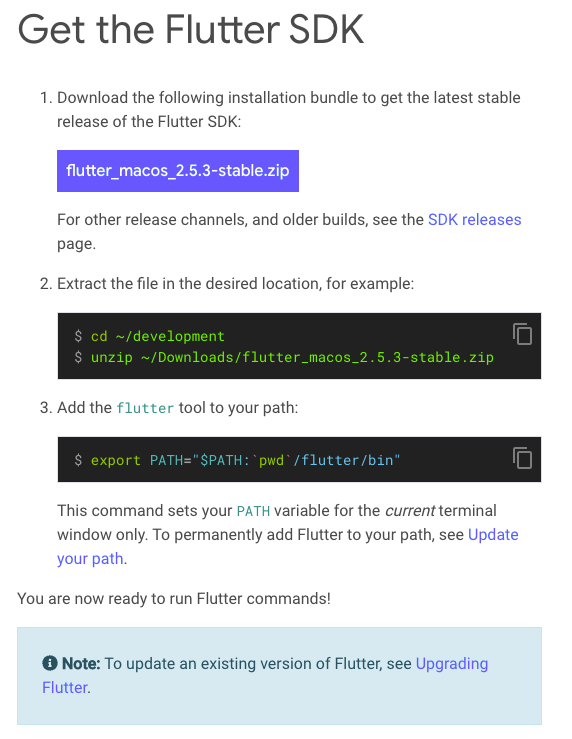
MacOS 환경에서는 우선 zip파일을 다운받고 압축을 푸는 것으로 시작합니다.
Flutter 파일을 원하는 곳에 압축해제하고 Terminal 창을 연 뒤 zshrc 설정을 해줍니다.


아래와 같이 export PATH="$PATH:[폴더 주소]/flutter/bin" 으로 등록해주세요.
작성이 완료가 되었다면 :wq! 를 통해 저장하고 나와주시면 됩니다.
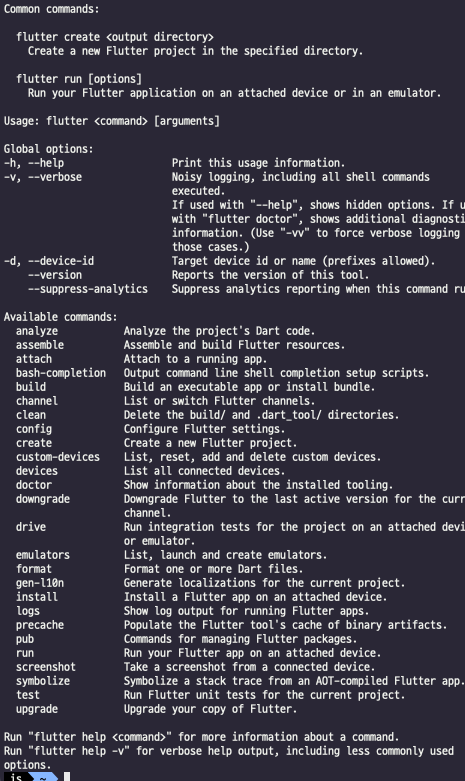
제대로 적용되었는지 확인하기 위해 flutter 를 입력해주시면 다음과 같이 command 목록이 뜨게 됩니다.
'IT > Develop' 카테고리의 다른 글
| iOS 개발, Xcode 아이폰 무선 디버깅하기 (0) | 2021.11.17 |
|---|---|
| Flutter 로딩 페이지 만들기(Splash Screen) (0) | 2021.11.11 |
| 마크다운(MarkDown) 문법 정리 (1) | 2021.10.05 |
| CSS로 footer 페이지 하단 고정하기 (0) | 2021.10.04 |
| Windows CMD에서 Linux처럼 ls 명령어 사용하기 (0) | 2021.09.17 |